Setting up the Honeywell Stocktake and Ordering PDE Scanner (EDA52)
Once your PDE scanner is delivered, you will need to follow the instructions below to set up the device and install the stocktaking program before it can be used for stocktaking or ordering.
Device Setup
1. Remove the PDE device from its packaging.
2. Remove the battery cover from the back of the PDE device by pressing down and sliding the latch mechanism towards the right.
3. Insert the battery into its correct position and place the cover back on.
4. Slide the battery latch mechanism back to its locked position (red indicator).
5. Use the provided USB-C cable to charge the battery for 3-4 hours before use.
5. Power on the device by holding the power button located on the top right of the device.
Start Up Settings
1. Select your language (English - Australia is an option under English) and press START.
2. On the Set up your EDA52 screen, press Manual Setup at the bottom.
3. (Optional) Connect to a WiFi network or press set up offline at the bottom.
4. Set your time zone, date and time if you selected to set up offline.
5. On the Google Services settings, scroll down and press Accept.
6. (Optional) Create a PIN code or press Skip.
7. (Optional) To adjust your screen timeout setting, swipe up on the main PDE screen -> Settings -> Display -> Advanced -> Screen timeout.
Symbology Settings
1. On the main PDE screen, swipe up -> Settings -> Honeywell Settings -> Scanning -> Internal Scanner -> Default profile -> Symbology Settings.
2. Tick Send check digit in the following symbologies: UPC-A, UPC-E, EAN-8 and EAN-13.

(For newsagents only) Tick Add-on 2 and Add-on 5 for UPC-A, UPC-E, EAN-8 and EAN-13 as well to be able to scan your magazine barcodes.

Make sure that Interleaved 2 of 5 is ticked.
Installing Stocktake Software
1. Download the PDE stocktake software HERE.
2. Connect the PDE device to your computer with the provided USB-C cable.
3. An AutoPlay notification will come up for the device at the bottom right of your monitor, click on it and select Open device to view files.
4. If you did not get an AutoPlay notification, left click on your Windows Start menu (window button), type in This PC and select it.
5. On the main PDE screen, swipe down -> press on Android System - Charging this device via USB -> press on Tap for more options. -> Select File transfer.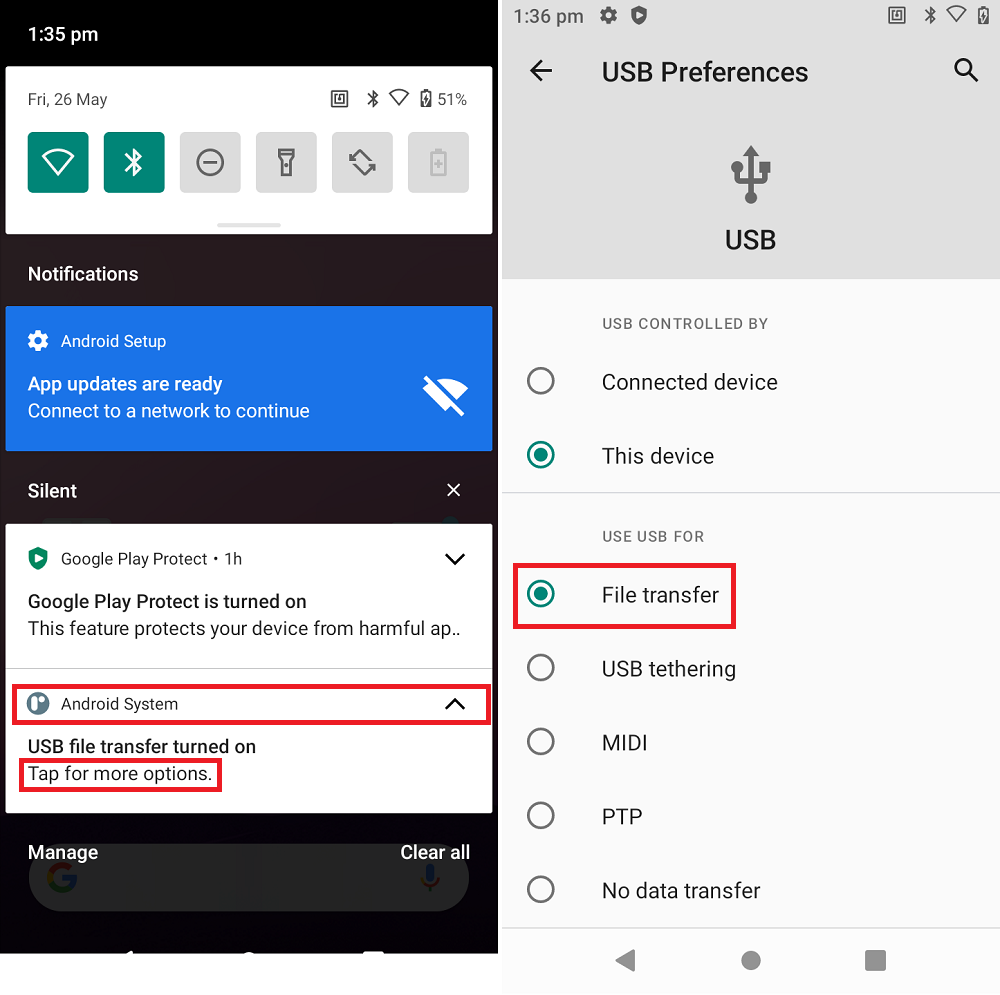
6. Back on your computer, inside This PC, double click into the EDA52 device -> Internal shared storage -> Download. Place the downloaded stocktake software (DataCollector-2.0.1.15) here.
7. On the PDE device, from the main PDE screen, swipe up for your list of Apps -> Files -> select DataCollector -> click Continue -> Install.
8. Once the software is installed, select Open -> Allow.
9. Go back to the main PDE screen by pressing the circle button at the bottom of the PDE screen.
10. You'll notice that it's placed the Data Collector software onto a second page. You can move the Data Collector to the first page of your main PDE screen by pressing and holding on the icon and then dragging it to the left corner of the screen.
Click HERE for how to stocktake with the PDE device.
Related Articles
Programming a Honeywell Barcode Scanner
Setting up a Honeywell scanner on a PC is very easy - you plug them in, wait for the battery to charge if handheld, and start using it - no install required. However, depending on the model, there may be some settings you need to change. Scanner ...Import file from Honeywell EDA50K PDE to Stock Manager
Before performing a stocktake, click HERE for more information on the types of stocktakes that can be performed as well as the precautions that you need to take before undertaking one. Scanning Items for Importing To unlock the PDE swipe up from the ...Stocktaking with a Honeywell PDE
Before performing a stocktake, click HERE for more information on the types of stocktakes that can be performed as well as the precautions that you need to take before undertaking one. Scanning Items for Stocktake From the main screen of the scanner, ...Common Scanner Issues
This is advice detailing what you can do when you run into an issue with your scanner. This can be applicable to these scanners supported by Tower: Symbol / Metrologic / Motorola / Honeywell (1452g, 1472g, MS-7580g, MS-7120g), Element Bluetooth ...Pairing an Element Bluetooth Scanner for Roam
The pairing steps shown below will only work with Element brand Scanners (Element P303). Setup Element scanner First, switch on the scanner by pressing the scanner button for 3 seconds. A light should indicate that it is on. Then, scan this QR code ...