Stopping / Clearing Print Jobs
- Click on the Start/Windows button on the screen or keyboard.
- Type in the word control.
In the list of results, click on the Control Panel option. - Click Devices and Printers
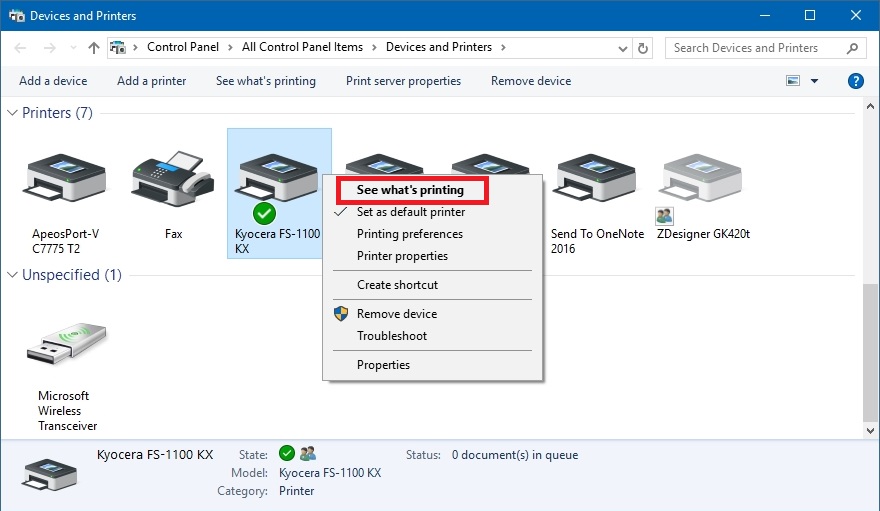
- For Windows 10, right-click on the printer that you want to stop. For Windows 11, click on Printers and Scanners, then click on the printer.
Then, click on the See What's Printing option.

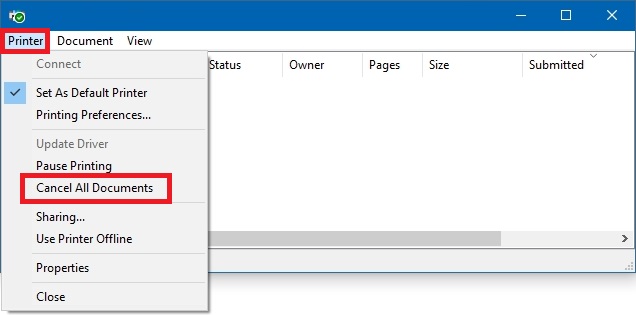
- The screen will display all the queued print jobs.
For Windows 10, on the top menu bar, click on Printer -> Cancel All Documents. For Windows 11, click on the three dots in the upper right, and select Cancel All.

- Wait for the print jobs to clear from the screen.
This may take several minutes depending on the number and size of the print job(s).
Related Articles
Setup Print and Email for Repair Job Invoices and Cards
The below instructions explain how to setup Report Mapping for the Repair jobs done in Retailer. These settings are used when Previewing, Printing and Emailing from the Repairs screen. From the Main Screen of Retailer, click Setup -> Point of Sale. ...
Print Barcode Labels with Catalogue Discount
Barcode Labels with the discounted price can be printed for stock items setup with Catalogue Discounts You can choose between a Shelf Label with the Discounted Price or a Was / Now barcode label From the Main Screen of Retailer, click Setup -> ...
Print Customer Labels / Barcodes from Retailer
Retailer provides you with the ability to print labels featuring barcodes linked to each of your customers. This can be used to create a loyalty or customer card. You can then affix the barcode label onto a pre-printed loyalty or customer card, ready ...
Print or Email Customer Invoices and Receipts (also in bulk)
In the Customer screen, you can email or print out a customer's invoices/receipts from a button near the bottom of the Customers screen. This can be done in bulk as well. To email invoices/receipts, your email needs to be setup in Retailer first. ...
Setup Print and Email for Quote and Invoice Management
The instructions below explain how to set up Report Mapping for Quote and Invoice Management. These settings are used when Previewing, Printing and Emailing from Quote and Invoice Management. On the top menu bar of Retailer, click Setup → Point of ...