
The Events function is available for all software rental customers. Customers not on software rental will need to transition in order to access this function and additional features. More information can be found in Switching your Tower Systems Software to Rental.
There are three different types of events that can be tracked within Retailer:
| Type | Function | Example |
| Stock Item Event | Track whether or not a customer has purchased a stock item within a period of time | Pet treatment products |
| Recurring Event | Based on a set date with a fixed recurrence | Birthdays, anniversaries |
| Repair Event | Based around a Repair Type | Major/minor service (bike) |
Setting up an event
- From the main screen of Retailer, Click on Tasks > Events
- Click on Setup then Add
- Enter a description for the event.
Note: The description could be displayed in email/SMS to your customers, so choose something customer friendly. - In type choose the event type (see chart at the top)
- In Frequency choose the period, then set the value below. Examples:
1 Week - Frequency: Daily, Freq. Value: 7
6 Months - Frequency: Monthly, Freq. Value: 6 - Choose send Email or SMS or both by ticking Send email or Send SMS
- In Message to send create a create a default message for email and/or SMS in the Message Template section.
Note: you can right click in the text field to add personalised fields, such as the customer's name. Messages can be modified before sending them. - For Repair events, click the Add/Remove Repair Type button, select the repair types associated with your event then click Save.
- For Stock Item events, manage the stock items in the Stock Items tab. You can enter an item as you would anywhere else in Retailer. You can add a list of items using the Add List button.
Customer Identities
Using customer identities, you can send specific, personalised marketing to large groups of customers.
A customer may have several identities related to different events.
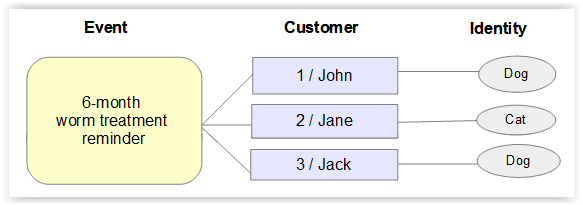
This diagram describes identities in relation to a Stock Item event.
A customer may have several identities related to different events.
This diagram describes identities in relation to a Stock Item event.
In this scenario, customers linked to the event will receive notification 6 months after their last worming tablet purchase with a message including their name and the type of pet.
Adding Customers and Identities
- Select the Registered Customer Identity tab and click Add.
- Select your event from the drop down list.
- Select a customer using the drop down list, or click the ... button to use the customer search screen.
- Select the relevant customer identity using the drop down list, or click the ... button to add a new identity.
- Enter a Last Occurrence date. Think of this as the last or initial occurrence of this event for this customer and their selected identity, e.g. their last birthday or worming treatment.
- Click Save to save this customer as an addition to your event's customer list.

For a guide to using events to create marketing lists, click HERE.